Caffeine culture around the world is constantly changing. There’s always something new being discovered or re-discovered in corners of the world that sweeps through and alters how everyone processes and prepares their coffee.
Since its debut, the Kalita Wave did just that. It has introduced and converted many coffee drinkers into brewing their morning cup with its unique apparatus. One of the main things that make an ordinary cup of coffee into a perfect one is the way you brew. We are here to guide you through brewing a little piece of perfection every day using a Kalita Wave.
Kalita Wave – Introduction And History
Kalita Co. has been connected and contributing to the coffee industry for close to seventy years now. In 2012 the coffee community of the world was surfing the latest wave that took the face of the pour-over method of brewing coffee. The Kalita Wave came forth from Kalita Co as the contender to compete against the likes of the Clever dripper and the V60. The name stands as a testament to the ridges adorning the walls of the filter.
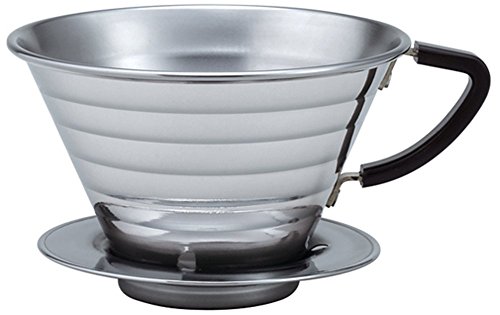
The primary feature that holds it apart is the flat bottom that has three holes for coffee extraction. It has a design to allow the water to move smoothly and evenly through the grinds resulting in a fresh brisk cup of coffee. You can choose to bring home either a ceramic, glass, or stainless steel version of the coffee maker depending on your style preferences.
![Kalita Wave series 185 Lotto [2-4 persons] #...](https://m.media-amazon.com/images/I/31WvJiCcMPL.jpg)

Brewing Guide – How To Use Kalita Wave
Once you decide that your daily cup of coffee is going to be something you create and not just something to make, you’re going to find a difference in how you treat that little brown bean. Without trying to sound too dramatic, it would be fair to say that a good cup of coffee can play a vital role in making a crappy day; survivable. It is a combination of the ingredients and implements you choose to use to brew along with how you source and look after them that cause varying shifts to the taste of your cup.
If you’ve decided the Kalita wave is the way to go for your daily caffeine craving; buckle up and take note of the hows, the whens, and the why’s that will lead you a flawless cup of caffeine everyday.
What You Need
- The Kalita Wave – Obviously, and this can be any glass, ceramic or stainless steel.
- Whole coffee beans – Get your hands on a bag of your favorite brand of whole coffee beans. It goes without saying but; the fresher the coffee beans the better. So don’t forget to peak at the best before date on the pack before you bring it home.
- A glass decanter – Make sure you have something to catch the coffee in while it brews.
- A coffee grinder – You can taste the effect of grinding your coffee immediately before you brew in your cup. It’s not just a treat for the taste buds, freshly ground beans also result in better bloom. And it’s a visual delight everyone waits for.
- Kalita Wave coffee filters – You cannot fit just about any filter into your Kalita Wave. So be sure you have stocked up on the Kalita filters that share the same name.
- Kettle filled with hot water – Caffeine veterans suggest that the water to coffee ratio should be close to the lines of 15:1 and the water temperature to be between 90-96°C.
Try and snag a Gooseneck kettle. It has a shape that offers the best control over the direction and speed of water flow. - Kitchen scale – If you prefer to weigh your ingredients out rather than measure them. Have a scale at the ready.
- A timer if you want to be extremely thorough.
- Your favored coffee mug – Everyone has that one mug they love to have coffee in. It somehow makes it taste especially great.
Step By Step Kalita Wave Brewing
Kalita Wave veterans suggest you should hope to achieve a brewing time that hinges somewhere between 3:00 and 3:30 minutes.
- Place your Kalita Wave over the glass decanter – Start by placing your Kalita Wave Coffee Maker over the glass decanter that you wish to brew into. If you don’t want or have a glass decanter or server of any sort, you can also place it on top of your coffee mug and brew directly into it.
- Place the Kalita filter – Place the Kalita filter comfortably in the coffee maker. The type of filter will depend on the size of the dripper you own. Kalita Co. offers two variants namely the 155 or 185 filters depending on the quantity of coffee you want to brew.
- Pour boiled water – Now pour some of the boiled water out of your gooseneck kettle. You do this to wet the Kalita filter before you place the coffee grinds in it. Some suggest this step also ensures that any papery taste from the filter is discarded with the water before you brew. It also helps the filter sit firmly within the coffee maker. Since the water is boiled, this step works to warm the glass decanter below.
- Throw the water away – Now throw away the water collected in the decanter.
- Grind the Beans – Set your scale to zero and measure out the coffee beans you need. If you’re using the Kalita 155, a safe bet would be to measure out close to 18 grams of coffee. If you’re using the 185 version, 30 grams of coffee should be enough. You can always alter the quantities in your future attempts if you’re not happy with the end result. Now grind till you’re satisfied you’ve got between medium and medium-coarse ground coffee. The texture of the grind is going to play a role in altering and the taste of your caffeinated drink. If you do not have a coffee grinder at home simply buy the freshest ground coffee you can get your hands on.
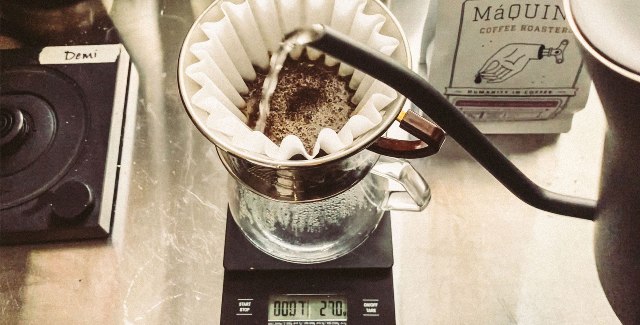
- Place the ground coffee – Pour out the coffee grind into the damp filter and flatten the bed. What follows next is what is referred to as the pulse method of brewing. It involves slowly pouring the boiled water through the beans in intervals with short breaks in between. The goal is to maintain an even flow rate throughout the brew.
- First Pour – Start your timer if you choose to use one. Start by slowly pouring in a little of the hot water onto the coffee and wet all the grounds. The first time you pour water over the grinds, only pour close to double the quantity of the coffee in the filter. Now stop and allow the coffee to rest for 30 to 60 seconds. This is when you will get to witness what is referred to as a coffee bloom. A coffee bloom is the visual confirmation of carbon dioxide that is trapped within the beans when they are roasted, leaving the coffee grinds when they come in contact with hot water. The fresher the coffee, the more carbon dioxide they hold within them and the more magnificent a bloom you will be treated to.
- Second Pour – Once the coffee bloom is complete, pour in close to 25 % of the water standing in the kettle and wait for fifteen to thirty seconds. Prefer to pour the water in a circular motion moving from the outside of the filter towards the center.
- Repeat – Repeat this process in intervals till you have poured out all water from the kettle that was set aside for this purpose.
- Finish up things – Once that is finished simply if you’ve brewed into a glass vessel of any sort pour the coffee out from the decanter into your favorite mug and enjoy.
Do not forget to clean everything you’re using to create your cup of coffee well each time you finish brewing.
Here is a Kalita Wave brewing guide video for graphic lovers –
Troubleshooting
As the equipment doesn’t has any bells and whistles, the only mistake which mostly happens is about the grind. Below are some tips to follow when you see the following outcomes.
- If the coffee grind in the filter is too coarse, it can lead you to a flat drink with hints of sourness in it.
- If on the other hand, the end result is too bitter for your taste, you could need to try the process with a coarser grind the next time around.
A cheat sheet that should help you identify if you’ve got the grind size down is the brew time. If your coffee is extracting much faster than expected, you might need to aim for a finer grind. Alternatively, if it’s taking too long, aim for a coarser grind.
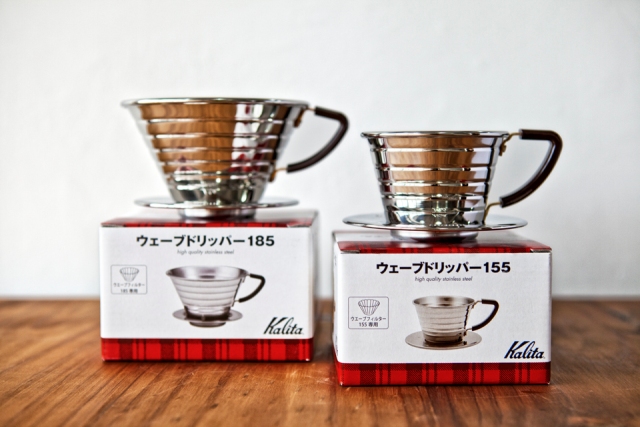
Kalita Wave 155 vs 185
As previously mentioned, Kalita has majorly come in two size formats – 185 and 155. As you might have already guessed, the higher numbered variant offers a larger quantity of cups in a single brew. If you are the only caffeine consumer at home, or simply prefer to only brew one cup of coffee at a time, the 155 is the most sensible purchase for you. The 155 is often also the go-to choice for anyone that often finds themselves with a coffee travel kit. It brews the perfect quantity for a travel coffee carafe.
If however, you’ve got a household full of grumpy morning people who all need their caffeine before they start the day, the 185 is what you should reach for. The 185 filters are for the larger drippers. And it churns out between three to four cups of each time you brew.
Not counting the shift in size, the features on both are otherwise identical.
All about Kalita Wave Filters
While brewing using the Kalita Wave, you’re going to have to use filters that come from the parent company itself all the way from Japan. No other brand or generic filters will work in it. The white filters are composed of the best quality coffee filter paper. They are constructed in a way that when placed inside the coffee maker, do not touch the bottom of the dripper. The ingenious idea is executed with an aim to minimize the extent to which the water you pour onto the grind comes in contact with the outer wall of the dipper. It also ensures there is a level of temperature control throughout the brew.
The patented wave that rides all around the Kalita filter ensures that air passes easily between coffee-grounds and the edges of wave. It also partly plays the role of insulator ensuring your brew stays warm. The filters are available in packs of 100 for a fairly reasonable price so don’t worry about a pocket pinch. Like any other element of the coffee making process, take care with storage. Make sure the filters don’t find a home underneath anything heavy as weight could cause it to change shape.
At the End of it all
When you find the right fix to your coffee cravings and the right fit to demands of wallet, kitchen and counter space, creating daily coffee concoctions transforms into a fun gig. You tend to take pleasure in caffeine experiments and start to fancy yourself a professional barista. The Kalita Wave offers a lot of control over the entire process. You get the freedom to decide and then change every decision with every step of the process. If you like to get your hands both literally and metaphorically dirty and prefer the personal touch in your coffee constructions, the Kalita Wave is the way to go.