Milk, that blanket of comfort that tops off our favorite caffeinated beverages. Where would our creamy cappuccinos, our mouth-watering macchiatos, and our luscious lattes be without it? Have you ever thought it strange, that even though a lot of the main ingredients in the names on the café menu are similar if not the same?
The final coffee in your cup tastes different? While it is true that at times the quantities vary, another element that plays a part; is how each ingredient is treated.
Many people enjoy that iconic white mustache that forms with a sip from your favorite cup of coffee. Have you ever wondered about how or why it exists? The milk in your cup is either taken on a trip to the steamer or has a whirl in the frother before it is added to the coffee. What’s the difference you ask?
What is Steaming
Steam is a term you’ve probably encountered in association with a train engine or pressure cooker in the past. So what role does it play in creating your caffeinated concoctions?
We’re going to have to get technical for a tic, so hang in with us.
Steaming milk is, as the name suggests, the act of steadily introducing the milk which will be used in your coffee to some high pressured steam. When this happens the fats inside the milk enlarge. A visual representation of which is the small bubbles you might see on the surface. In fact, the result of some superbly steamed milk is a creamy coating on the surface called a microfoam.
If your local coffee shop is a common pitstop in your everyday life, chances are you’ve come across baristas working what is known as a steam wand. You might have even heard them talk of terms like stretching.
Stretching, strangely enough, refers to the act of adding air to the milk while heating it up. The act causes the milk to increase in quantity. It is usually accompanied by an iconic hissing sound. Don’t let it scare you. It means you’re doing things right.
Steaming vs Frothing
It might come as a surprise to a few, but there is a difference between steaming and frothing. People often confuse the two. There is a general assumption that the act of one leads to results in the shape of the other.
Breaking it down to the most basic level, milk is steamed in order to heat it up. Frothing, on the other hand, is done with the sole aim of adding air to milk. Through this step, you’re actively including an added texture in your cup. If done right, you’ll be treated to a thick and fluffy prime quality foam.
While steaming your milk implies you’re in for a hot beverage. The same cannot be said for frothing. We’re sure you’ve had a comfortable share of iced cappuccinos with a crown of froth on its top.
While steaming milk will cause it to expand a little, it doesn’t take up too much space in your cup. Milk froth on the other hand can easily occupy at least a third of the space in your cup.
While steaming will lead to elegant and light air bubbles. Milk froth makes for more of a mouthful.
The cappuccino can serve as the perfect mascot of how frothing can contribute to cozying up a cup of coffee. On the other side of the scale. Flat white’s from the land down under, and caffè macchiatos offer insight into the best of what coffee with just steamed milk would taste like.
How to Steam Milk (by a Machine)
So you’ve decided to put on those gloves; lace up those boots and get down to business. While steaming milk might sound or look like a simple task, it can be tricky and does take some time to master. Before you begin though it’s important to remember, steam burns hurt a little more than normal so do be careful when you’re going this a go.
What You’re Going to Need
- Milk – The obvious star ingredient. Feel free to pick the milk that suits your palate and stomach needs. It is however advised to opt for milk that is cold. So be sure to pop.
- Thermometer – This might seem strange to some, given that the aim of the game is to heat the milk up. While there are those who can steam milk to perfection just by feeling it, that level of skill takes time and patience to master. Till you get to that level, it helps to keep a thermometer nearby to ensure you aren’t inadvertently burning the milk before you get a chance to drink it.
- A jug or pitcher to hold the milk.
- An espresso machine with a steaming wand.
What You’re Going to Need to do
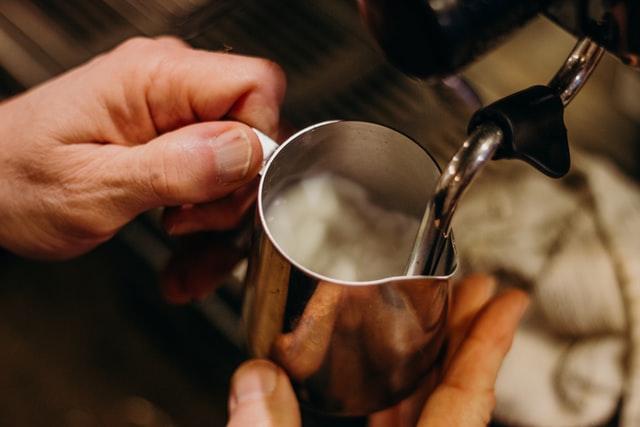
- Pour Cold Milk into Pitcher: Start by pouring in some of the cold milk into the pitcher. Do not fill to the top as the milk will expand as you work it. An easy indication to help you gain an estimate is to fill till it hits the lower inside end of the spout on the pitcher.
- Wipe the Steam Wand: Before you begin to steam, wipe down the wand of the espresso machine, then aim it at the drip tray and switch the steam on to release any water and other gunk stuck inside.
- Dip and turn on the Tip of Steam Wand just below the milk surface: Now it comes time to stretch and pull some air into the milk. To do this, dip the tip of the steaming wand gently in the milk. Stop just below the surface of the milk and hit the steam switch on. An auditory confirmation you will receive that you’re doing things right is a hissing sound. By the end of this process, you’d hopefully be able to spot the tiny layer of micro-foam at the top of your milk. It should take close to five or seven seconds for the fats in the milk to expand. Be careful the milk doesn’t splatter out.
- Dip further into the milk: Next, it’s time for the spin. To achieve this simply dip the steam wand further into the milk. Make sure you have complete control over the entire process. Follow the principle of slow and steady. You’re not aiming to touch the bottom of the pitcher, rather stop once you feel you’re on fifths in.
- Tilt the Pitcher: It’s now time to carefully tilt the pitcher, once again not too fast and not too far. The tilt is just a little till roughly at a forty-five-degree angle so you can spot something that resembles a whirlpool forming in the milk. This step is imperative in ensuring a creamy tasting result.
- Check Temperature: If you’re new to the whole process, it’s time to whip out that thermometer and pop it into the pitcher. The milk should stand close to sixty degrees Celsius. Once it nears that number, stop steaming. If you can’t seem to get your hands on an external thermometer, simply swirl till the temperature in the pitcher rises making it too hot to touch.
- Wipe the machine: Before you move any further, grab a damp cloth and wipe the steam wand clean. If you leave cleaning for later, chances are the milk will dry and stick. This will make it harder to remove later on.
- Tap the pitcher: Grasp the handle of the pitcher and lightly tap it. Try and get rid of any tiny bubbles on the top.
So we have created the steamed milk, but let’s not just end here. Below are the steps to pour this steamed milk over to your drink. This is considered the toughest and trickiest part by some.
- Before you begin, move the pitcher around a little to swirl the milk. This step is called polishing. So hopefully by now, you can see some deliciously shiny milk in your pitcher.
- Different people use different techniques to achieve the perfect pour. One way is to divide it into two parts.
- Diving; which involves aiming to get the milk underneath the delicious crema crowning the espresso. So raise your cup roughly two inches above the pitcher and pour in the dead center.
- As the level in the cup raises increase the rate of pour and reduce the distance between the cup and pitcher while you tilt the pitcher forward. This should hopefully cause the foam to fold over resulting in a pretty design.
While steaming is a fun task to master, it’s important to not sweat the small stuff. Give yourself time to perfect the skill. And above all, remember to have fun with it.
How to steam milk without a machine
Not everyone needs or wants a coffee machine with a million buttons and knobs. It can be confusing and intimidating to many people. So if you don’t have a scary mean machine gracing the countertop of your kitchen, have no fear. You can still make a great cup of espresso without a machine. We have other ways to steam milk as well without an espresso machine.
French Press
A favorite amongst most coffee drinkers for its simplicity, portability, and sustainable design. It might surprise you to know a French Press can work wonderfully to create some elegant microfoam. All you really have to do is wash and dry your french press well. Place warm milk in the glass cylinder. Attach the lid on top and move the plunger up and down in quick succession. You will see the quantity of the milk increase in front of your eyes. Stop when you are satisfied and pour that delicious smooth froth over your espresso.
Microwave
If you’re someone just stepping foot in the wonderful world of coffee, chances are you don’t possess a lot of the equipment required to construct a cup of coffee. For example, you have a beautiful Turkish coffee maker, now, how will you froth. Every kitchen, however, usually contains a microwave. And luckily for us, that is enough.
One of the things you can do is fill the milk you’re going to use in your drink in an airtight jar. Close the lid properly and shake away for. Move the milk up and down and all around for between thirty to sixty seconds. Or until you can see the mass of milk increase. Once that happens pour the milk out into a glass container and heat it on high in the microwave for close to thirty seconds.
When pouring it out over your espresso, remember to hold the foam back at first, only heaping it on the top once the milk level rises.
Via Pot on the Stove
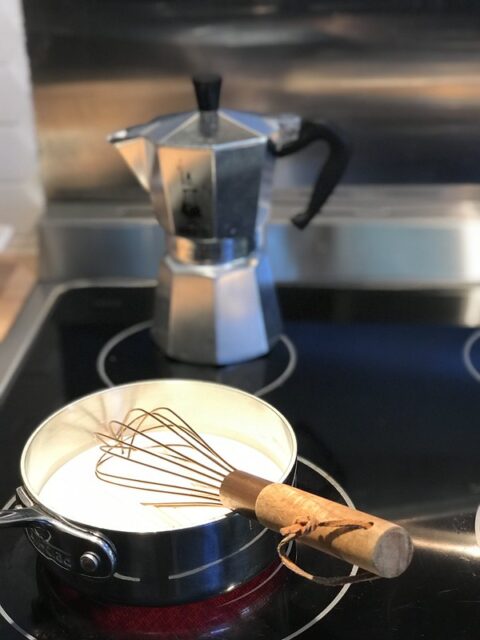
Saving the simplest alternative for last. Should you be in the mood for a no muss no fuss method. Just place the milk for your coffee in a pot on the stove. Heat it up to the desired temperature. Once done. Whip out your kitchen whisk, usually used for beating eggs or fresh cream and get to work. Beat the milk for roughly thirty seconds, or this you spot froth start to form. As you did with the jar. Hold the foam back with a spoon while pouring the milk in. Lastly top it off your coffee with a hit of fluffy foam.
How to Froth Milk
There are a few key distinctions between forthing and steaming that we already touched on. If you’ve decided to opt for a steam wand to arrive at the end result. What really matters is how deep you choose to dip the wand. If the head of the wand is extremely near the surface you’re basically allowing more air to enter in and interact with the milk to form froth.
So when it comes time to froth, the time you insert the steam wand into the milk be sure to stop just below the surface and near the edge of the pitcher. Movement is imperative as you’re trying to incorporate as much air as possible. Feel free to go forward, back high and low. The mild ideally will expand more than 1-1/2 times in size. Once you’re happy don’t wait too long and allow it to sit. Simply pour the froth into your cup. Sit back and sip and your velvety thick coffee.
What kind of milk is good for frothing
Over the years diet restrictions coupled with moral and lifestyle choices have caused people to explore alternatives in everything they put into their bodies. Add to that the fact that a new fad storms through every month or so declaring to the world to have discovered the latest elixir of life. It’s no surprise food and drink is constantly evolving.
The milk in your mugs is no exception. With choices that allow you to pick between whole, skim, 2%, raw and organic milk. To options like fat free and lactose free.
And that’s not including all the non-dairy varieties that keep popping up. Surely you’re familiar with soy, hemp, macadamia, almond, cashew, coconut and oat milk.
While you can enjoy your morning cup of coffee with any kind of milk that suits your tastes and needs. There’s no denying, there are some that feel and taste better when frothed than others. After all a milk not suited to frothing might lead to a flat, dull foam.
1. Whole Milk
Was there ever really any doubt about who would sit at the helm of this ship? Yes the world has moved past and around whole milk; however there is nothing yet that can touch the feel, taste and calibre that it brings to a beverage.
To understand why, you might have to dip into the building blocks of milk. Whole milk for example is composed of a delicately balanced mix of fats, water, sugar and protein.
Remember that micro foam we mentioned before? It won’t take you a tonne of tries to get that locked in if you’re working with whole milk. You won’t even need to get yourself some complicated apparatus to achieve it.
If money matters usually sit on the front seat in the decision making process. Whole milk remains the most accessible and inexpensive option on our list. And while there have been some interesting interpretations and alternatives over the years. Nothing on any list can offer the bona fide flavour that frothed whole milk brings to your caffeinated cup.
2. Almond Milk
Although almond milk has existed as a non dairy option for a long time now; it’s only over the last two decades or so that people have started to take notice of it again. Almond milk stands above its competitors on account of the high fat content in its contents. This results in a delightfully thick froth. It is a little trickier to build it up though when compared to whole milk. Even baristas have a hard time with it at first. Once mastered though, they’ve been known to be fans, and enjoy showing off their skill creating unique artwork on top of your coffee cup. Almond milk is also a favourite amongst diet conscious drinkers, on account of it being offered in both a sweetened and unsweetened version.
There is a small snag though. Coffee drinkers at times find the flavour of almonds from the milk mixing in and mixing up the flavour of their coffee. Be careful if you choose to froth with this milk though it is known to curdle when
3. Coconut Milk

Over the last few years the coconut has taken center stage in the coffee community. While it was common to spot coconut in chocolates and curries. The invasion into the dairy district has changed the game for many people. With coconut milk taking up counter space as the top supplement that allows coffee drinkers to cut dairy from their diet. And while the milk has a decent consistency, this variant doesn’t seem to be a big fan of frothing.
Simply put, the froth formed with this milk, just isn’t of the same density you might expect from a cappuccino. If lighter bubbles work just as well for you, don’t hesitate to give this a go. The coconut milk does bring its own taste twist to the caffeinated drinks. And while it’s definitely not for everyone, those that swear by it, turn to nothing else.
4. Soy Milk
Stepping forth next are the soy milk soldiers. Soy milk was one of the first alternatives non dairy drinkers turned to, to solve their coffee quandary. It has been offered up as an option for a long time now.
The chemical composition of the milk allows the milk to stretch and the foam to present as a dense layer of deliciousness. It even offers a creamy mouthful. However there have been a few complaints. Soy milk once frothed, tends to fall in clumps when being poured over your coffee. If appearances don’t rank on your list of preferences it is the answer you’ve been looking for. The thing that clinches it for most, is the fact that soy doesn’t have a very strong flavour profile of its own. Which in turn means it doesn’t offer anything that will interfere with the taste and enjoyment of your drink.
5. Skimmed Milk
Some people simply cannot make the switch. They miss the memory of the flavour of really milk. However they hope to give the guilt and calories that come along a miss. While skimmed milk cannot replace the fullness that whole milk brings with it. It is a steady compromise.
The basic structure of skimmed milk is a little different from its whole counterpart. Skimmed milk offers more of protein and considerably less of the sugar and fat. This results in a uniquely foamier froth. Skimmed milk is very malleable. Which means you’re someone starting out with a coffee set up in your home for the first time. It’s a smart choice to turn to. It allows for an inexperienced hand.
FAQs
How long does it take to steam milk?
While the answer could vary depending on everything from the temperature of milk when you begin to with the quality and type of milk you're using. The general consensus is, the milk should begin to steam within twenty to thirty seconds.
Do you froth milk before or after you have drawn the shot of coffee?
Coffee comes first. While different types of coffee are assembled differently. The espresso is always the first point of attention. Add to that the fact that ideally you do not want the milk to sit idle and alone for too long.
Is steamed milk sweeter?
Yes. While steaming milk when you raise the temperature; this in turn allows the sugar in the milk to dissolve faster and ends up tasting a tad sweeter.
At the End of the Day
While there are those that wouldn’t dream of tainting their cup of coffee with even a dash of the white umbrella. There are others who cannot enjoy their morning mix without it. If you’ve always been envious of the craftily constructed cups of coffee at your local coffee shop. You now have a chance to create one yourself.